A hassle-free Thanksgiving menu
Aaron Hutcherson and Becky Krystal share their favourite courses
Sign up to IndyEat's free newsletter for weekly recipes, foodie features and cookbook releases
Get our food and drink newsletter for free
As we face our second Thanksgiving amid a pandemic, we may find ourselves in one of two camps: eager to pull out all the stops, reinvigorating holiday traditions, or, perhaps, looking for ways to glide through with less hoopla and more relaxation. To that end, we wanted to give readers options for how to feed their families and friends with the desired vibes: fancy or simple.
Some are in search of a project to provide a sense of normalcy in these (shudders to type this) unprecedented times. That means recipes that require a bit more preparation and planning, and a menu that gives guests a reason to dress up a little and maybe even put on hard pants. If this sounds like you, grab a tablecloth, bust out the nice dishes and take a look at Aaron’s fancy-ish holiday menu.
Others of us can’t fathom tackling anything close to the traditional Thanksgiving menu, but still want to find a way to express gratitude. In this instance, Becky’s simple and comforting Thanksgiving recipes are just what the doctor ordered. These recipes are designed to be hands-off, low-lift and full of clever tricks to make cooking as stress-free as possible – a holiday meal perfect for stretchy pants and a leisurely day.
If you find yourself somewhere in between, you can mix and match as you see fit. Aaron’s turkey and dessert with Becky’s focaccia and vegetables? Sounds like a winning combination to us. Just want to grab one of these recipes to add to your usual menu? In the words of Tabitha Brown, “That’s your business.” Because regardless of what you cook, we want it to be satisfying and low-stress.
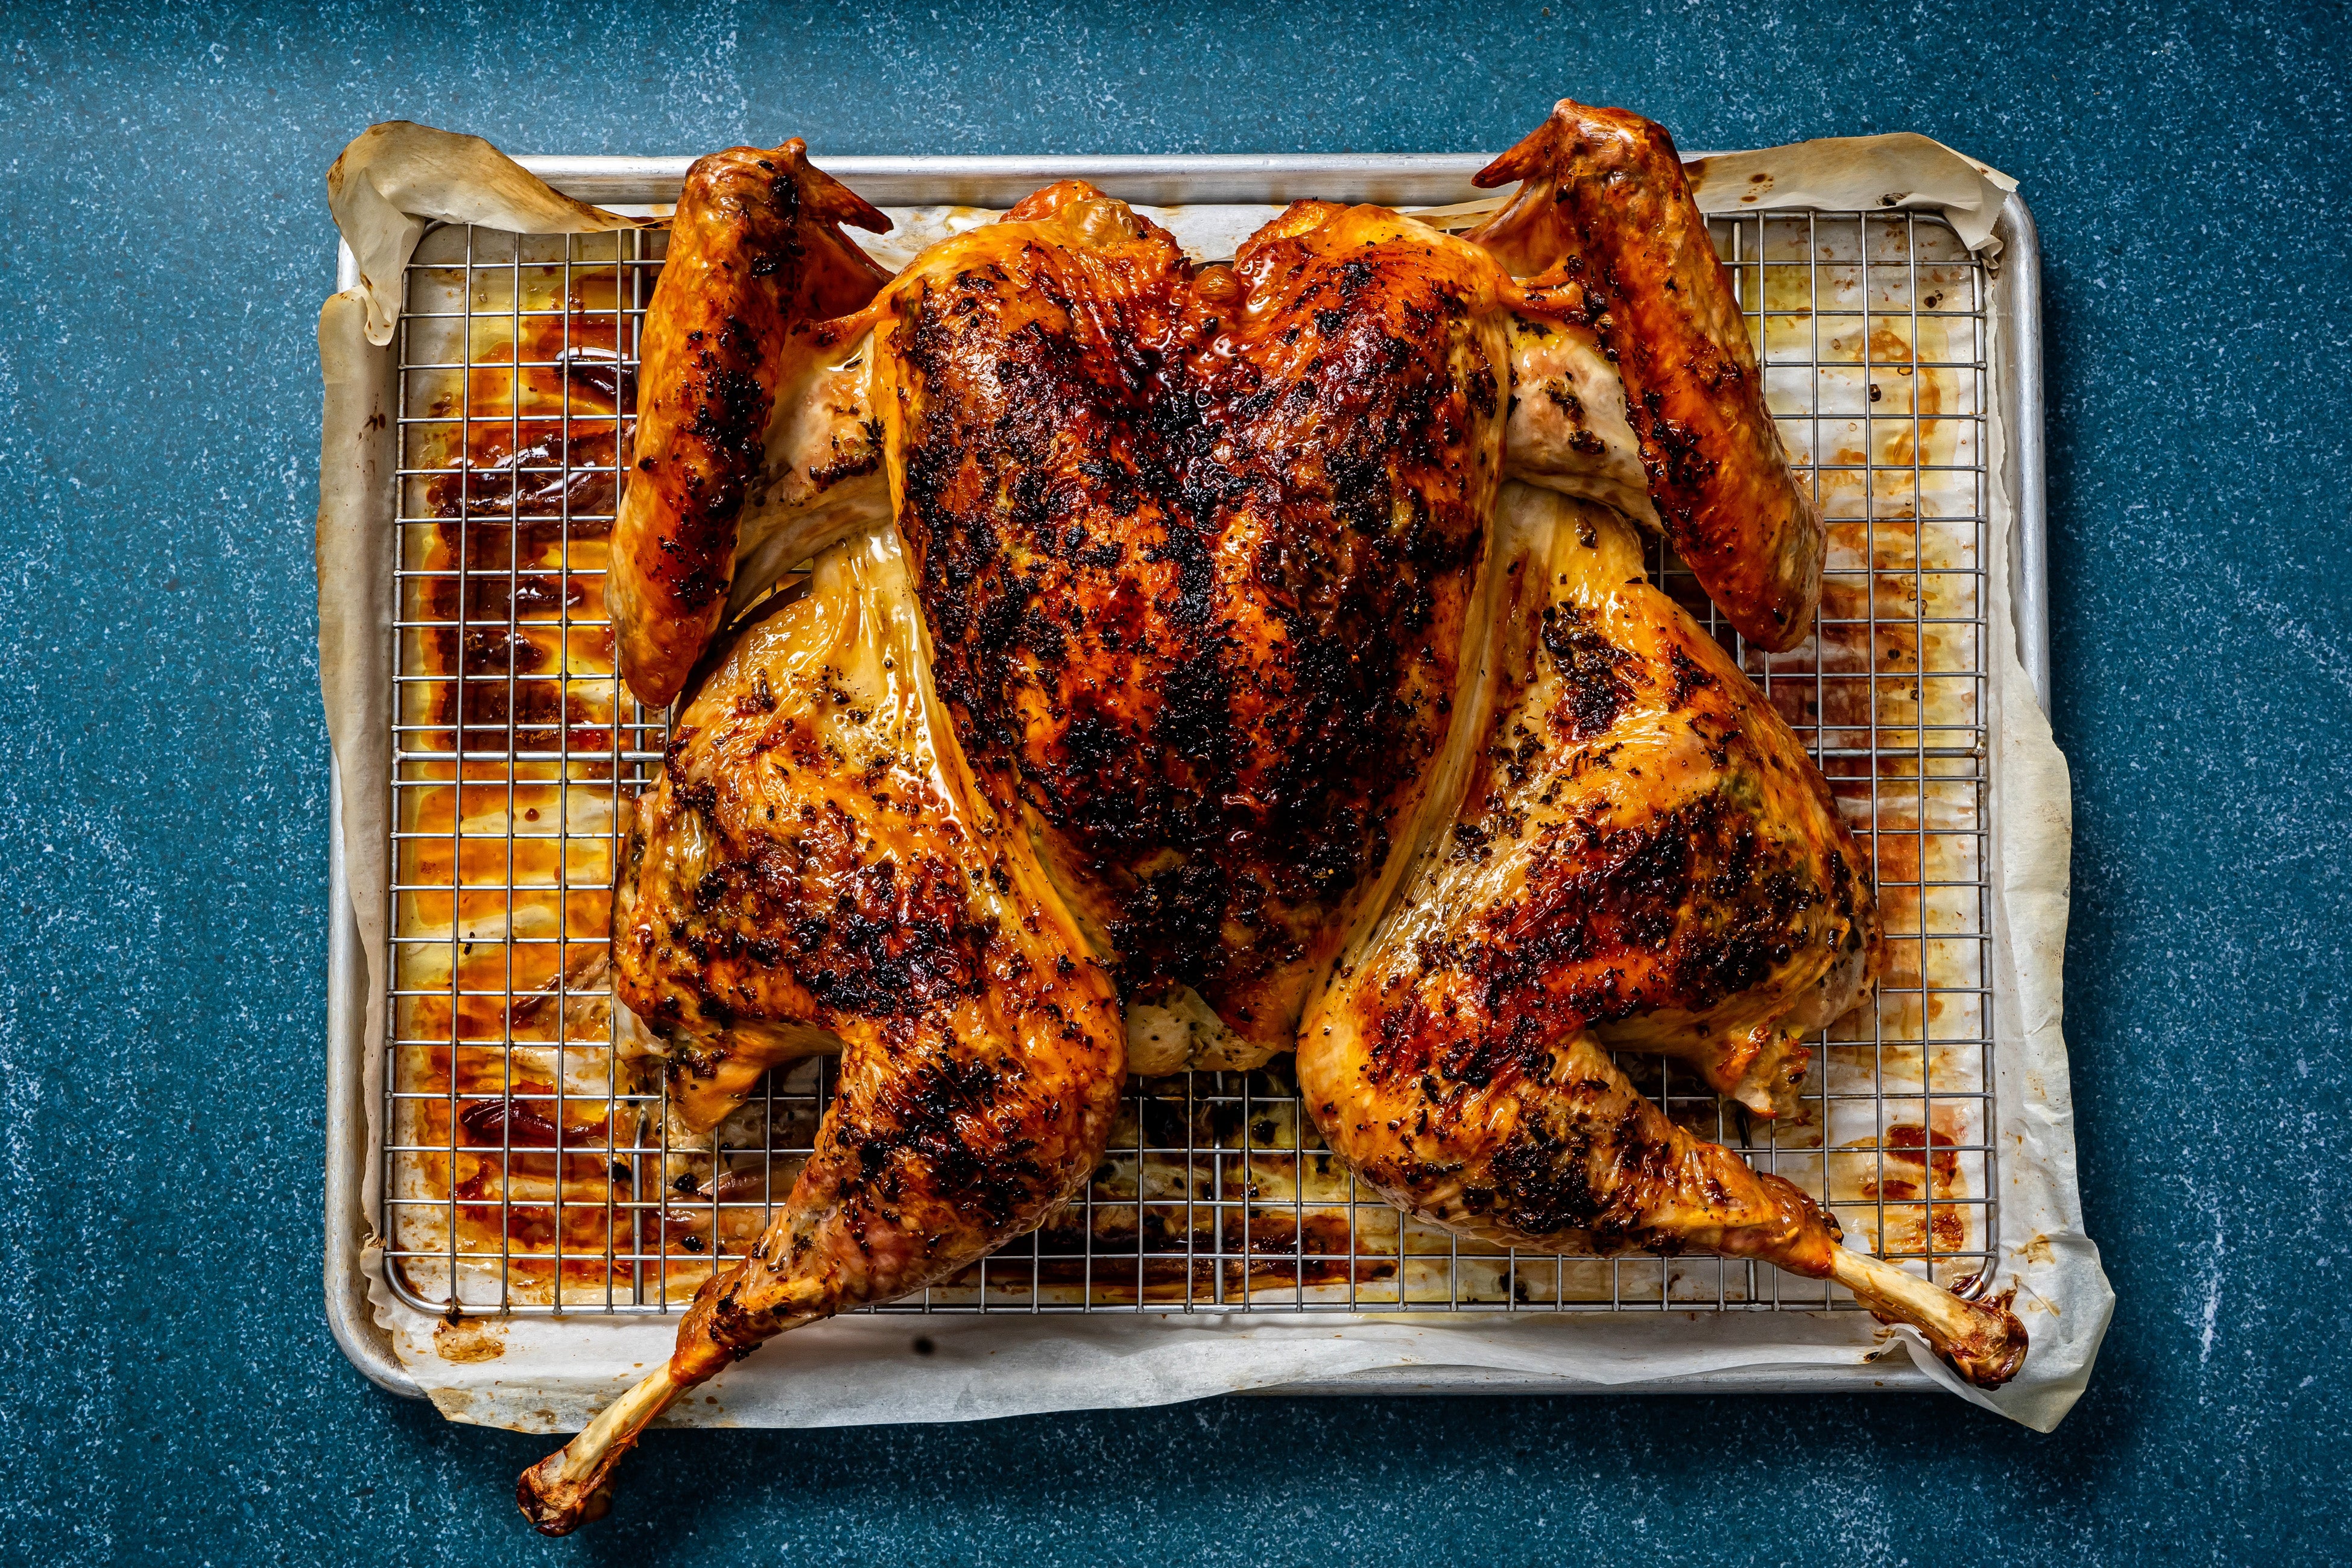
Tarragon-butter roasted spatchcocked (butterflied) turkey
Active time: 30 minutes | Total time: 2 hours plus 2 days’ seasoning
Serves: 10 to 12
Aaron: I’ve always wanted to brine a turkey, but as someone who usually travels for Thanksgiving, it’s always been out of reach. Now is the time. A simple dry brine with just salt and a couple of days in the fridge leads to more flavourful meat and incredibly crispy skin. A compound butter with fresh tarragon, garlic, lemon zest and black pepper gets rubbed underneath and on top of the skin to infuse the turkey with flavour as it cooks. Spatchcocking, AKA removing the backbone and flattening the bird, and a hot oven allow the turkey to cook in a fraction of the time compared to when kept whole, which helps it stays nice and moist (a probe thermometer that stays in the turkey while it roasts is great for monitoring doneness without having to constantly open the oven). Last but certainly not least: put those delicious pan drippings to good use and make gravy.
Make ahead: The turkey needs to be seasoned and refrigerated for at least 1 day, but preferably 2 or 3 days, in advance.
Storage notes: Leftovers can be refrigerated for up to 3 days.
Ingredients:
4.5-5.5kg turkey
1 tbsp fine sea salt or table salt
8 tbsp (113g) unsalted butter, at room temperature
4 cloves garlic, minced or finely grated
6g finely chopped fresh tarragon
1 tsp finely grated lemon zest (from 1 lemon)
1 tsp finely ground black pepper
Method:
1. Line a large, rimmed baking tray with parchment paper or aluminum foil and place a wire rack inside.
2. Set the turkey, breast side down, on a cutting board. Remove the giblets, if included. Using kitchen shears, cut along both sides of the backbone, removing a strip about 5cm wide; reserve the backbone and giblets for making stock. Turn the bird breast side up and use the heels of your hands to press down on the breast bone, flattening it slightly. Pat it dry with towels and sprinkle the salt evenly over both sides of the turkey. Transfer it to the prepared baking tray, breast side up, tuck in the wing tips, if desired, and refrigerate (ideally on the bottom shelf, for food safety purposes), uncovered, for 1 or up to 3 days (you’ll have better seasoned meat and crispier skin the longer it is refrigerated).
3. In a small bowl, mix together the butter, garlic, tarragon, lemon zest and pepper until thoroughly combined. Gently slide your fingers under the skin of the turkey to separate it from the flesh along the breasts and thighs, being careful not to tear the skin. Don’t worry about not being able to separate it fully – just do as much as you can. Using your fingers, rub half of the compound butter directly on the meat underneath the skin. Massage the skin from the outside until the butter is distributed in an even layer. Rub the remaining compound butter all over the skin of the turkey as evenly as possible. Maneuver the bird so it fits on the baking tray, but if the drumsticks hang over the pan’s edges, that’s OK.
4. Let the turkey sit at room temperature. Meanwhile, position a rack in the middle of the oven and preheat to 230C. Roast the turkey for 45 minutes to 1 hour 15 minutes, until an instant-read thermometer inserted into the thighs registers 74C and the skin is crisp and nicely browned (note that sometimes the herbs in the butter can burn, which mostly affects appearance and less so flavour. If this is of concern to you, tent it with foil while it finishes cooking once the desired colour is achieved.) Let the cooked turkey rest 20 to 30 minutes before carving.
Cider-braised turkey thighs with potatoes and apples
Active time: 40 minutes | Total time: 90 minutes
Serves: 4 to 8
Becky: I never cared all that much about getting the crispiest skin on the Thanksgiving turkey or even the drama of bringing a whole bird to the table to be carved. Mostly I was interested in whatever tasted best and was easiest to make.
Last year, that led me to develop a one-pan dish of harissa-glazed turkey drumsticks roasted on a baking tray. This year, I decided to continue with the single-dish theme by turning to my reliable casserole dish. Worth repeating was the reliance on dark meat, the parts of which are generally more affordable than a whole bird or breast – the four thighs in this recipe cost me just about £10. Moreover, dark meat is rich in taste and forgiving, maintaining its tenderness and flavour as much as 30 degrees past white meat's ideal temperature of 73C. Since I did drumsticks last year, I turned to turkey thighs, which, much like my wine-braised chicken thighs, I presumed would do well in the casserole dish.
Success! These cider-braised thighs turned out to be the most hands-off yet delectable main course that I would take over a whole bird or breast any day. Consulting with the queen of braises, AKA cookbook author Molly Stevens, helped me nail the recipe.
First you brown four turkey thighs in the pot (they’re big enough that each can be easily carved into at least two servings after cooking). The browned bits left behind serve as the foundation for the braising liquid that will ultimately turn into rich, golden juices that all but eliminate the need, or desire, for a separate gravy. In keeping with the season, hard cider makes up the bulk of the braising liquid (chicken broth and/or unsweetened juice or cider would be fine for those avoiding alcohol), with cider vinegar and thyme for brightness. The liquid bathes a bed of potatoes, carrots and apples, on top of which sit the thighs. This lets the turkey juices render and mingle with the braising liquid and vegetables, while maintaining some of the crispness of the skin. Uncovering the pot toward the end of cooking helps with browning the food and concentrating the braising liquid without affecting the meltingly tender meat coaxed while the casserole dish is sealed.
This recipe cooked best in a large oval casserole dish (7.5L), but it also worked in a 5.2L round Dutch oven. Because the food is more stacked with less opportunity for evaporation, the braise may need to cook longer and you might want to reduce the braising liquid on the stovetop after it comes out of the oven. Swap in your choice of root vegetables or herbs, too. You can adjust the recipe to your desired timeline. If you want an even slower braise, lower the temperature of the oven and cook longer.
No matter which route you take, I suggest leaning into the homey, welcoming nature of the dish by bringing the casserole dish right to the table for serving. Let everyone gather and serve themselves, ideally with plenty of the juices for drizzling over mashed potatoes or, of course, dipping slices of my no-knead focaccia with sausage, apple and shallots.
Recipe notes: The braise can be made up to 3 days in advance and refrigerated in the casserole dish (if your casserole dish is not enameled, transfer to another container for storage). Or refrigerate leftovers for a maximum of 3 days. Reheat covered in the oven at 180C or on the stovetop until warmed through. For crispier bits, you can reheat the turkey and vegetables on a sheet pan in the oven at 180C, with warmed cooking liquid served on the side.
If you want to use chicken thighs, cut the vegetables a little smaller so they will cook through faster. Aim for 30 minutes covered in the oven and then take the lid off until the chicken is finished, an additional 15 to 20 minutes.
Ingredients:
4 bone-in, skin-on turkey thighs, patted dry
Fine sea or table salt
Freshly ground black pepper
2 tbsp olive oil
3 cloves garlic, thinly sliced
58g cider vinegar
340g hard cider (may substitute a mix of low-sodium chicken or vegetable broth and unsweetened apple juice or alcohol-free sparkling cider)
15 sprigs thyme, divided
2 bay leaves
680g baby gold potatoes, halved (quartered, if large)
225g carrots, scrubbed, halved lengthwise and cut into 1-inch pieces
2 medium apples (370g), peeled, cored and each cut into 10 to 12 wedges
Method:
1. Position a rack in the middle of the oven and preheat to 180C. Season the turkey thighs all over generously with salt and pepper.
2. In a large casserole dish, preferably enameled cast-iron and oval, over medium-high heat, heat the olive oil until shimmering. Place two of the thighs skin side down in the pot and sear until dark golden brown (the pieces should release easily once browned), 3 to 4 minutes, using a splatter screen as needed. Flip over and cook until the other side is dark golden brown as well, another 3 to 4 minutes, adjusting the heat as necessary. Some browning on the bottom of the pan (the fond) is good. Transfer the thighs to a large, rimmed baking tray or platter and repeat with the remaining pieces.
3. Reduce the heat to medium. Pour off all but about 1 tablespoon of the rendered turkey fat (you can strain and refrigerate the excess to save for roasting vegetables). Remove any burned pieces of meat or skin. Add the garlic to the pan and cook, stirring constantly, until fragrant and golden but not browned, 30 seconds to 1 minute.
4. Add the cider vinegar to the pan, minding the vigorous bubbling and steam. Using a spatula or wooden spoon, scrape up any browned bits on the bottom of the pan. Stir constantly, cooking until the vinegar has reduced to about 1 tablespoon. Pour in the hard cider, scrape up any browned bits again, add 10 of the thyme sprigs and the bay leaves, and return the heat to medium-high. Let the cider bubble away until it has reduced by around two-thirds, 8 to 10 minutes (if you’re using a round casserole dish, you may want to take it a bit farther because the liquid won’t cook down as readily in the oven). Turn off the heat.
5. Place the potatoes, carrots and apple wedges in the bottom of the pan. Season with salt and pepper. Arrange the browned turkey thighs on top, overlapping as little as possible. Cover and braise for about 40 minutes, or until the turkey registers 68-71C on an instant-read thermometer (don’t be surprised if this takes longer if your ingredients are more overlapped due to the shape or size of your dish). Remove the lid and continue cooking until the meat reaches at least 73C (a little higher is fine, as dark meat is forgiving) and the vegetables are tender, an additional 5 to 10 minutes. Discard the bay leaves and, if desired, the thyme sprigs.
6. Let the braise rest for at least 10 minutes, as it will be very hot. You can return the lid to the pan if you’re trying to keep it warmer longer – the casserole dish will insulate it well. Sprinkle with the leaves from the remaining thyme sprigs, then serve directly from the pot, making sure to include plenty of the braising liquid.
Variation: If you want to use chicken thighs, cut the vegetables a little smaller so they will cook through faster. Aim for 30 minutes covered in the oven and then take the lid off until the chicken is finished, an additional 15 to 20 minutes.
Mushroom and leek cornbread dressing
By: Aaron Hutcherson
Active time: 30 minutes | Total time: 1 hour 45 minutes
Serves: 6 to 8
Aaron: Cornbread dressing is a must on my Thanksgiving table and my favourite part of the entire meal. The version that my family typically prepares includes celery, onions, peppers, chicken and/or turkey stock, sometimes a few pieces of turkey meat mixed in, and a smattering of herbs and spices, but each family and cook prepares it differently. Some like to use packaged corn muffin mix for convenience and flavour it with sausage and apples, while others include white bread in the mix and are all about the crispy bits.
Though I might get disowned from my family if I prepared something other than the standard version for the big meal, cornbread dressing is ripe for experimentation. Enter this mushroom and leek version, a vegetarian spin on my family’s standard recipe.
Making cornbread dressing, naturally, starts with cornbread. The recipe I’ve shared below is a version of my mother’s. While you can make this recipe from start to finish in one day, I recommend baking the cornbread in advance to spread out the cooking and make your time in the kitchen on Thanksgiving Day a little easier (you can also assemble the dressing in advance and bake it right before serving).
To assemble the dressing, start by sauteing mushrooms until browned for meaty umami. Creminis are always easy to find, or you could use oyster or hen of the woods mushrooms if you’re feeling fancy – feel free to mix and match and use whatever type(s) you like. Then, add in some leeks for subtle onion taste and sweetness, and flavour it with fresh tarragon for a woodsy, citrusy note, a couple cloves of garlic, salt and pepper (it’s important to wait to salt the mushrooms until after they’re browned).
The last step is to combine the mushroom mixture with the cornbread and vegetable stock. It’s key at this point to make sure there’s enough liquid for a moist dressing, as some of the stock will evaporate as it bakes. To that end, the dressing mixture should look a little soupy before it goes into the oven, like you've made a mistake and added too much liquid (you haven’t). The amount of stock listed below led to the perfect consistency in my tests, but it’s always wise to have a little extra on hand in case your batch of cornbread is super absorbent for whatever reason (if you’ve never made cornbread dressing before and are feeling nervous about it being dry, add in extra stock and you can always bake it a little longer, if needed).
Make this entire recipe from start to finish in a cast-iron frying pan if you want to use only one pan, or bust out your finest casserole dish if you’re feeling fancy.
Make ahead: The cornbread can be baked up to 2 days in advance and stored in an airtight container at room temperature. The dressing can be assembled up to 1 day before and baked just before serving.
Storage: Leftovers can be refrigerated for up to 3 days.
Ingredients:
For the cornbread:
85g unsalted butter
215g fine or medium ground cornmeal
95g all-purpose flour
1 tbsp granulated sugar
1 tbsp baking powder
½ tsp fine sea salt or table salt
1 large egg
240ml whole milk
For the dressing:
2 tbsp extra-virgin olive oil
225g sliced mushrooms, such as cremini, oyster, shiitake or a combination
2 tbsp (30g) unsalted butter
1 large (340g) leek, dark green parts trimmed, rinsed and thinly sliced
½ tsp fine sea salt or table salt, plus more to taste
½ tsp ground black pepper, plus more to taste
2 cloves garlic, minced or finely grated
2 tablespoons chopped fresh tarragon
720ml unsalted or low-sodium vegetable stock
Method
1. Make the cornbread: position a rack in the middle of the oven and preheat to 200C. While the oven heats up, put the butter in a 25cm-inch cast-iron frying pan (or other similarly sized metal pan) and place in the oven to melt, 5 to 10 minutes.
2. Meanwhile, in a medium bowl, add the cornmeal, flour, sugar, baking powder and salt and whisk until combined. Add the egg and milk and mix until evenly combined. Once the butter has melted and the oven is preheated, carefully remove the pan from the oven, add the melted butter to the batter and whisk until fully incorporated.
3. Transfer the batter into the preheated pan and bake for about 20 minutes, or until firm to the touch and a cake tester or toothpick inserted in the middle comes out clean. Transfer the pan to a wire rack and cool for at least 10 minutes. Then, lift the cornbread out with a spatula and transfer to a wire rack to cool completely. Crumble the cornbread into a large bowl. Wipe out the pan.
4. Make the dressing: in the same pan or using a large nonstick pan over medium-high heat, heat the oil until shimmering. Add the mushrooms and cook, stirring occasionally, until nicely browned in spots, 7 to 10 minutes. Add the butter, leeks, salt and pepper and cook, stirring regularly, until the leeks start to soften, 3 to 5 minutes. Add the garlic and tarragon and cook, stirring regularly, until the leeks have fully softened, 1 to 2 minutes more.
5. Add the mushroom-leek mixture and vegetable stock to the crumbled cornbread and mix until evenly combined. (It will look a little soupy, but that’s necessary for a moist dressing). Taste, and season with more salt and/or pepper, if needed.
6. Transfer the dressing mixture to the same cast-iron pan or an ungreased 20cm square pan or similarly sized casserole dish, smooth out the top and bake for 30 minutes, until golden on top. Remove from the oven and let cool slightly. Serve warm.
No-knead focaccia with sausage, apple and shallots
By: Becky Krystal
Active time: 30 minutes | Total time: 3 hours
Serves: 16 (makes one 33-by-45cm bread)
Becky: As someone who’s often indecisive and strapped for time, I’m a big fan of the concept of “the best of both worlds”. That's what prompted me to develop no-knead focaccia with sausage, apple and shallots.
This large-format, eye-catching side takes the flavours and ingredients of stuffing or dressing, depending on your geography, and morphs it with bread. After all, one of stuffing’s main components is already bread, so why not just turn it into something that lets you reap the joy of a fresh loaf? There are no compromises here, just something new and delicious. You’ll never have to choose between stuffing and bread again if you don’t have the bandwidth for both.
The recipe uses a make-ahead dough that will last as long as two weeks in the refrigerator. It is based on the dough and concept of our popular fast focaccia from the Artisan Bread in Five Minutes a Day team of Zoe François and Jeff Hertzberg, but instead of small round loaves, you get a whole baking tray’s worth. The bread is baked at a relatively high temperature of 220C, meaning it can go into the oven at the same time as many roasted vegetables, including my roasted broccolini with lemon and chilli flakes.
The resulting slab is tender and fluffy, an ideal companion for the braising juices of my cider-braised turkey thighs with potatoes and apples. Of course, it would also be right at home with your favourite gravy or pan sauce. If your crowd is smaller or you know you want to save some for the next day or so, hold back on cutting the entire slab. Extras can be sliced in half horizontally to build the leftovers sandwich of your dreams.
I loved the classic profile of sausage, apple, shallots and sage, but you can use whatever toppings you like, as long as they’ll cook through in the bake time. Or precook them as needed. Other options that would be great: roasted or sauteed mushrooms, rosemary, pan-fried bacon, cooked and crumbled vegan sausage, dried cranberries and sliced onions. Keeping it simple with just flaky salt on top is also a fine strategy. For a scaled-down option, you can convert this into smaller loaves in 22cm round cakes pans – halve the dough for 2 round loaves or quarter it for just one. The round loaves will bake in 20 to 25 minutes.
Make ahead: The dough needs to rise at room temperature for 2 hours.
Storage notes: Once the dough rises, it can be refrigerated for up to 2 weeks in a lidded but vented container (not airtight), or frozen for a few months in an airtight container. Leftover focaccia can be refrigerated for up to 3 days. Reheat in the 180C oven for a few minutes, or toast in a toaster oven until warmed through.
Ingredients:
1.02kg unbleached all-purpose flour
770ml plus 1 tbsp lukewarm water, divided
120ml plus 3 tbsp extra-virgin olive oil, divided
2 tbsp granulated sugar
1 tbsp dried instant yeast (not rapid rise)
2½ tsp fine sea or table salt
340-425g mild or hot Italian sausage (bulk ground or removed from casings), separated into 2-2.5cm pieces
1 small apple, cored and cut into ⅓cm wedges
2 shallots, halved lengthwise and cut in ⅓cm wedges
8g cup fresh sage leaves
Flaky sea salt, for sprinkling (optional)
Method:
1. In a large 4.8L or 5.7L bowl and using a wooden spoon, stir together the flour, 780ml water, 60ml of oil, the sugar, yeast and sea or table salt, forming a rough dough. Cover the bowl with a towel and let rise for 2 hours (if your bowl is smaller than recommended, transfer the dough to a container large enough to allow the dough to double in size and cover).
2. The dough can be used right away, but it's much easier to handle once thoroughly chilled, about 3 hours. For longer-term storage, transfer the dough to a vented container (if airtight, the lid can pop off), where it can stay for up to 2 weeks.
3. Meanwhile, place the sausage pieces in a microwave-safe pie dish (or other large, shallow dish you can cover) along with the 1 tablespoon of water. Cover with a plate and microwave on HIGH until cooked through, 4 to 5 minutes (the meat should have reached an internal temperature of just about 70C, but remember it will cook more in the oven). Drain the pieces from the liquid in the plate and let cool.
4. Pour 60ml of the remaining oil into an 33-by-45cm rimmed baking tray, tilting the pan to coat it thoroughly. Scrape the dough onto the pan and start to press it out; it will not fill to the edges of the pan. Tent the dough with greased plastic wrap or place inside an extra-large reusable zip-top bag (45L) and let rest for 10 to 15 minutes.
5. Position a rack in the middle of the oven and preheat to 220C. If you have a baking stone, place it on this rack, too (you may use an upper- or lower-middle rack if you have something else in the oven, too, such as roasted vegetables, but be sure to rotate from top to bottom halfway through baking).
6. Use your hands to gently push the dough to the edges of the pan (lightly oil them or dip them in some of the oil on the pan to prevent sticking, if needed). Use a pastry brush to spread the remaining 3 tablespoons of oil across the top of the dough. Press the cooked and cooled sausage, apples, shallots and sage leaves evenly into the dough in whatever arrangement you want. Try to get the toppings almost, but not all the way, to the bottom of the dough. Re-cover the dough with the greased plastic wrap or zip-top bag and let the dough rest and rise for 20 minutes, then sprinkle with the flaky salt, if using.
7. Transfer the baking sheet to the oven, atop the heated stone, if using, and bake for 25 to 30 minutes, or until the focaccia crust is medium brown and feels dry and firm on the surface. The toppings may have a few charred edges.
8. Using a rounded knife, loosen the loaf from the edges of the pan, then slide the focaccia onto a large cutting board. (You can also cut it in the pan if you prefer.) Cut the loaf into approximately 2-by-3-inch pieces. You should get 32 pieces. Serve warm or at room temperature.
Dough recipe adapted from ‘Artisan Pizza and Flatbread in Five Minutes a Day’ by Zoe François and Jeff Hertzberg (Thomas Dunne Books, 2011), as posted on ArtisanBreadInFive.com.
Vegan braised collard greens with miso and smoked paprika
Active time: 30 minutes | Total time: 1 hour 15 minutes
Serves: 6 to 8
Aaron: Braised collard greens are a staple in black foodways, showing up at casual Sunday dinners and big holiday meals alike. They are typically seasoned with smoked meat – such as pork neck bones, turkey wings or pig tails – which imbue the greens and potlikker with tons of smoke and umami. (I wish I had a bowl right now!) But reflecting my evolving consciousness concerning meat consumption, I wanted to make a meatless version with a similar flavour profile. Enter this recipe for vegan southern-style collard greens.
For smokiness, I turned to a pantry seasoning favourite: smoked paprika. It gets added in with red pepper flakes, garlic powder, salt and pepper while an onion sautes in a bit of olive oil. Then, add in vegetable stock and ribbons of collard greens to simmer until as tender as desired (some people like a little bite left in the greens, while others prefer them to be nice and silky).
Lastly, miso, a fermented seasoning agent most popular in Japanese cuisine, and apple cider vinegar get swirled in at the end of cooking. There are many varieties of miso, and any can be used in this recipe, but I prefer a darker, more robustly flavoured red type (AKA miso) when cooking. Miso provides the umami that would have otherwise been added by meat while the vinegar perks up the flavours.
Storage: Leftovers can be refrigerated for up to 4 days.
Where to buy: Aka (red) miso can be found in well-stocked supermarkets, Asian markets or online.
Ingredients:
2 tbsp extra-virgin olive oil
1 large yellow onion, sliced
1 tsp smoked paprika
½ tsp garlic powder
½ tsp finely ground black pepper
¼ tsp crushed red pepper flakes
¼ tsp fine sea salt or table salt, plus more to taste
950ml unsalted or low-sodium vegetable stock
2 bunches (about 900g) collard greens, washed, de-stemmed, if desired, and cut into 0.5-1.5cm thick ribbons
2 tbsp red miso paste
2 tbsp apple cider vinegar
Method
1. In a large pot over medium heat, heat the oil until shimmering. Add the onion and cook, stirring occasionally, until it starts to soften, 3 to 5 minutes. Add the paprika, garlic powder, black pepper, red pepper flakes and salt and cook, stirring regularly, until fragrant, about 1 minute.
2. Add the stock and raise the heat to bring to a boil. Add the collard greens, reduce the heat so the liquid is at a simmer, cover and cook until the collards are tender, from 45 minutes to 1 hour 30 minutes or more, depending on the age of the greens and how much chew you want them to have. Stir in the miso and vinegar until the miso dissolves, taste, and season with more salt, if desired. Serve warm.
Roasted broccolini with lemon and chilli flakes
Active time: 5 minutes | Total time: 20 minutes
Serves: 4 to 6
Becky: If you’re trying to keep your Thanksgiving meal small and simple, it can be all too easy to give short shrift to the sides. Not so with this roasted broccolini, which you can throw together in mere minutes.
I wanted a dish that would have enough acidity and kick to cut through the typical richness of a holiday meal. And since my menu already included a hearty braise and bread, something green was definitely in order. Broccolini won the day with its gentle bitterness. Plus, it’s quick to cook and looks great on a platter.
I developed this recipe to be slipped into the oven at the same time as my no-knead focaccia, with the high heat at 220C helping create enviable crispy edges on every piece so no one has to fight for them. They’re the best part, in my opinion. Almost as appealing is one of my favourite little twists: the salt. Rather than just seasoning with salt alone, I first mixed it with the zest of one lemon. Rubbing the zest with the salt helps bring out all the lemon’s essential oils and ensures that the zest can be distributed more evenly than it would had you just tossed it on the stalks.
The broccolini would be good enough like that. But to catapult it to greater heights, I add a hit of red pepper flakes and then, after roasting, sprinkle the vegetables with just a bit more of the lemon salt, to taste (feel free to reduce or cut the red pepper flakes for the heat-averse). Be sure to save the zested lemon to turn into wedges for serving. A last splash of juice further accentuates that bright flavour.
I give a range for the roasting time to account for the varying thickness of broccolini stalks and your desired level of doneness. The temperature is fairly flexible as well, depending on what else you have in the oven at the same time. If you reduce the temperature, bake for a little longer. If you increase it, cut the time.
Ingredients:
1 lemon, finely zested (1 to 1½ tsp zest) and cut into wedges, for serving
1 tsp fine sea or table salt
450g broccolini, root ends trimmed, if needed
2 tbsp olive oil
¼ tsp red pepper flakes
Method:
1. Position a rack in the middle of the oven and place a large, rimmed baking tray on the rack. Preheat to 220C (you can use another rack if you have other items in the oven).
2. In a small bowl, rub together the lemon zest and salt until thoroughly combined. In a large bowl, toss together the broccolini, olive oil, red pepper flakes and a generous ½ teaspoon of the lemon zest mixture. Carefully remove the heated baking tray from the oven and transfer the broccolini to the pan, spreading the stalks as evenly as possible in a single layer; some overlap is OK. Roast for 15 to 20 minutes, or until crisp-tender with some dark, crispy bits on the florets, or to your desired level of doneness. Season with more of the lemon zest mixture, to taste.
3. Serve warm or at room temperature, with the lemon wedges on the side.
Cranberry tart with gingersnap cookie crust
Active time: 30 minutes | Total time: 3 hours 30 minutes
Serves: 8 (makes one 22cm tart)
Aaron: Say what you will, but I’m a fan of jellied cranberry sauce from a can. I love the smooth, bouncy texture and sweet-tart flavour it adds to the Thanksgiving plate, and this cranberry tart is an homage to that simple adornment – but turned on its head.
With a lustrous red filling ringed with almost iridescent golden and orange dried fruit, this tart is a showstopping dessert that ends the meal with dramatic flair. Still, similar to my aim with every recipe I share, it’s completely accessible.
To save you from the finickiness of pie crust, the press-in cookie crust is easy to assemble and eliminates the need for a rolling pin. It’s flavoured with ground ginger, cinnamon, allspice and molasses to evoke a gingersnap cookie. It gets blind baked in a tart pan with a removable bottom (or you can use a pie plate if that’s all you have) and that’s all the oven time required for this dessert.
The filling is adapted from a Cook’s Illustrated recipe that utilises the heat from the simmered fruit to cook the egg yolk and cornstarch added to help set the mixture. I added orange and ginger for a hint of spice and citrus in the tart cranberry filling, but you can experiment with other flavours if you want to make this recipe your own. Though there is a modest amount of sugar added for sweetness, I must warn you that this tart is still quite, well, tart, which can be a refreshing way to end a filling meal.
Lastly, if you so desire, diced crystallised ginger and candied orange peel – which I think look like tiny jewels – are mixed with crushed gingersnap cookies to form a beautiful crumble to garnish the dessert. Otherwise, a dollop of whipped cream would do for a simpler adornment that can also help sweeten it up a bit, if that’s more your thing when it comes to holiday desserts.
Make ahead: The crust must be refrigerated for at least 30 minutes and up to overnight before blind baking. The baked crust can be allowed to cool completely and stored loosely covered at room temperature 1 day in advance.
Storage: Leftover tart can be covered and refrigerated for up to 3 days.
Where to buy: Candied orange peel can be found in specialty stores and online. Alternatively, you could use more crystallised ginger or another dried fruit, such as cranberry or apricot, in its place, or simply omit it.
Ingredients:
For the cranberry curd:
455g fresh or frozen cranberries
250g granulated sugar
Finely grated zest and juice of 1 orange
One (5cm) piece fresh ginger, peeled and thinly sliced
Pinch fine sea salt or table salt
3 large egg yolks
2 tsp cornstarch
55g unsalted butter, cut into 4 pieces and at room temperature
For the gingersnap cookie crust:
113g unsalted butter, at room temperature
55g dark brown sugar
50g granulated sugar
1 large egg yolk
2 tbsp molasses
220g all-purpose flour
2 tsp ground ginger
1 tsp ground cinnamon
½ tsp ground allspice
¼ tsp fine sea salt or table salt
For the cookie-fruit crumble (optional):
50g crumbled gingersnap cookies
50g diced crystallised ginger
50g diced candied orange peel
Method:
1. Make the cranberry curd: in a medium saucepan over medium-high heat, combine the cranberries, sugar, orange zest and juice, ginger and salt and bring to a boil, stirring occasionally. Adjust the heat to maintain a very gentle simmer, cover and cook until all the cranberries have burst and started to shrivel, about 10 minutes.
2. While the cranberries cook, in a small bowl, whisk together the egg yolks and cornstarch until smooth. Transfer the hot cranberry mixture to a blender. Immediately add the yolk mixture, cover loosely (see note), gradually increase the speed to high and blend until smooth, about 1 minute. Let the mixture cool, uncovered, in the blender until a skin forms and it registers 48-51C on an instant-read thermometer, about 1 hour 30 minutes.
3. Make the gingersnap cookie crust: in the bowl of a stand mixer fitted with the paddle attachment, beat the butter and brown and granulated sugars on medium-low speed until smooth, 2 to 3 minutes.
4. Increase the mixer speed to medium, add the egg yolk and molasses and mix to combine. Stop the mixer and scrape down the sides and bottom of the bowl thoroughly. Add the flour, ginger, cinnamon, allspice and salt and mix on low speed until fully incorporated and the mixture looks like crumbly cookie dough, about 1 minute.
5. Turn out the dough into a 22cm tart pan with a removable bottom. Use your fingers to press it evenly across the bottom and up the sides. Loosely cover with a kitchen towel or plastic wrap and refrigerate for at least 30 minutes and up to overnight.
6. When the crust is ready to bake, position a rack in the middle of the oven and preheat to 180C. Dock the crust across the bottom with a fork and blind-bake (without pie weights), until evenly golden brown, 20 to 22 minutes. Transfer to a wire rack and let cool completely before adding the filling.
7. When the cranberry puree has cooled, add the softened butter and blend until fully combined, about 30 seconds. Pour the puree into the crust and smooth with an offset spatula into an even layer. Let the tart sit at room temperature for at least 2 hours.
8. Make the cookie-fruit crumble: if desired, combine the cookies, crystallised ginger and candied orange peel in a medium bowl and sprinkle all around the edge of the tart. Slice into wedges and serve at room temperature.
Note: When blending the hot puree, be careful to not fill the blender pitcher more than halfway. Remove the centre ring from the lid and place a kitchen towel over the opening as you blend. This will allow steam to escape and protect you from splatters.
No-bake pumpkin pie cheesecake
Time: 30 minutes | Total time: 30 minutes, plus overnight chilling time
Serves: 8-10 (makes one 22-25cm pie)
Becky: The standard side-of-the-can pumpkin pie was never quite the thing for me. In an effort to sell myself on the concept in previous years, I’ve used dulce de leche rather than granulated sugar or sweetened condensed milk. I’ve made a tart, also featuring caramel in the filling. I’ve even skipped the pumpkin pie entirely.
This year, I wanted a happy medium – something that channeled the spirit of pumpkin pie but in a form that was much more appealing to my tastes. I also wanted something simple to assemble and designed for making ahead. I couldn’t be more thrilled with my resulting no-bake pumpkin pie cheesecake.
Yes, the classic pie gets the cheesecake treatment in this light, creamy and not-too-sweet dessert designed for Thanksgiving or any autumn meal. The filling is a fluffy blend of cream cheese, whipped cream, confectioners’ sugar and pumpkin puree, perked up with just the right amount of lemon juice and spices (cinnamon, cardamom and ginger). My big breakthrough came when I decided to microwave the canned pumpkin puree. It made a huge difference in concentrating the flavour and achieving the right texture for incorporating the pumpkin into the cream cheese mixture. Don’t skip it! Other than that step, this is a no-cook treat, meaning you can free up valuable oven space and time.
Recipe notes: The cheesecake is best made at least a day in advance for the ideal texture. It can then be refrigerated for up to 3 days.
Ingredients:
One (425g) can pumpkin puree
240ml heavy cream
340g cream cheese, softened
85g unsifted confectioners' sugar
1 tsp fresh lemon juice
1 tsp vanilla extract
1 tsp ground cinnamon
½ tsp ground cardamom
½ tsp ground ginger
One 22cm (170g) or 25cm (255g) prepared digestive biscuit crust
Candy pumpkins, for decorating (optional)
Method
1. Spread the pumpkin puree in a wide, shallow, microwave-safe dish, such as a pie plate, and microwave on HIGH for 10 to 12 minutes, stirring two or three times, until it has dried out, darkened in colour and taken on a nutty, toasty aroma (you can cover with wax paper or a towel if you’re concerned about splattering). Let cool completely, placing in the refrigerator to speed up the process, if desired.
2. In the bowl of a stand mixer fitted with balloon-whisk attachment or using a large bowl and a handheld mixer, beat the heavy cream on high speed, just until stiff peaks form (pull off the whisk attachment or the beaters out and see how the cream looks in the bowl and on the beaters. If it flops over, it needs more time; if it holds a peak, you’re set.) Transfer the whipped cream to a smaller bowl or container; cover and refrigerate until ready to use.
3. Place the cream cheese in the same mixer bowl (no need to wipe it out); use the mixer’s paddle attachment and beat on medium speed until smooth. Add the confectioners’ sugar, and starting on low speed and then gradually increasing to medium, beat until thoroughly combined. Add the lemon juice, vanilla extract, cinnamon, cardamom and ginger; beat on medium speed until smooth. Scrape down the sides and bottom of the bowl and add the cooled pumpkin, beating on medium until evenly distributed. Scrape the bowl one more time and give it a few stirs with a flexible spatula to ensure there is no cream cheese stuck to the sides or bottom.
4. Using a flexible spatula, gently fold in half of the whipped cream. Lift the cream cheese mixture from the bottom of the bowl over the top of the whipped cream, rotating the bowl as you work and trying not to deflate the whipped cream too much. This folding step will help lighten the cheese mixture. Then, fold in the remaining whipped cream. This is your filling.
5. Using an offset spatula or spoon, spread the filling evenly over the prepared graham cracker crust. Refrigerate, ideally overnight, to cool and firm up. The pie can be cut and served directly from the refrigerator. Decorate with the candy pumpkins, if using, before slicing.
Variation: To make your own graham cracker (or other cookie) no-bake crust, follow these guidelines from cookbook author Jessie Sheehan. A general rule is that a 22cm pie calls for about 200g of crumbs ground in a food processor or finely crushed in a zip-top plastic bag with a rolling pin; 4 to 8 tablespoons (55-115g) of melted butter, and sugar to taste, 2 to 4 tablespoons. You’ll know you have the right ratio when you can squeeze a bit of the mixture between your fingers and it holds its shape. You can place the formed crust in the freezer to set or bake it at 180C for 8 to 10 minutes until fragrant and set. Cool the crust completely before adding the filling.
© The Washington Post
Subscribe to Independent Premium to bookmark this article
Want to bookmark your favourite articles and stories to read or reference later? Start your Independent Premium subscription today.
Join our commenting forum
Join thought-provoking conversations, follow other Independent readers and see their replies